

Made of 6 separate captures with Speedlite 600EX-RT

Light Painting with continuous light

Light Painting with continuous light

A history of light painting can be seen here:
NY Times Lens article about Harold Ross' work:
This is a link to Harold Ross' blog. He talks about light painting and his techniques:
http://haroldrossfineart.wordpress.com
To make an image using a continuous light you will need to keep the camera on a tripod and the shutter open. This discussion is for the Canon 5DMIII. Set the exposure for a length of time that will allow you to paint the light on the subject and the background (30 seconds is the maximum time allowable). The room has to be dark enough that it doesn't pick up any stray light during the long exposure. The f stop and ISO are determined by trial and error. With practice a rhythm will develop and improve your painting skills.You can also use the Bulb setting but the shutter has to remain depressed during the entire exposure. You can use the Canon Remote Switch RS-80N3 to release the shutter and keep it open by exposing the red dot on the release handle. Slide the mechanism off of the red dot to close the shutter.
To make an image using a multiple flash image you are going to actually make multiple captures with each exposure having the flash in a new position. With the camera on a tripod and the flash in one hand you setup the remote exposure as outlined below. A special cable is needed which is outlined below.
Remote Camera Setup
We learned how to remotely trigger the 5D MIII by using a special cable called the Canon N3 to mini phone by connecting the N3 side to the Canon's remote control terminal and the mini side to the Pocket Wizard II's camera port. By setting another Pocket Wizard Plus II to the same channel as the one attached to the camera, the camera shutter can be released by the remote Pocket Wizard Plus II when you press the test button remotely. We need a third Pocket Wizard Plus II to be attached to a Canon 600EX-RT (this is the only Canon flash with a pc connection) using a pc to mini cable. The pc end is inserted into the flash's pc terminal and the mini end is plugged into the 3rd Pocket Wizard Plus III's flash terminal. The 3rd Wizard has to be set on a channel that is one number higher than the other two Wizards. The 600EX-RT is set on External Manual Metering by using the custom function 5 option 3 as described below. Now we have the 600EX-RT and 3rd Pocket Wizard Plus II in one hand and the remote camera firing Pocket Wizard Plus III in the other. As we point the flash where we intend the light to land, we push the test button on the 1st Wizard and it trips the shutter and then automatically uses the pocket wizard mounded in the camera's hot shoe to sync with the flash and 3rd PocketWizard that is set on the next higher numbered channel. The subject needs to remain perfectly still and then as many captures from as many positions can be captured.
To use the flash on Manual External Metering you will need to the page from the manual which is at the bottom of the page. There is a external reflected light sensor on the front of the 600EX-RT that will read the light where the flash is pointed.
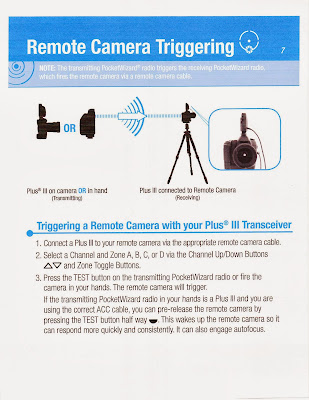
How to use the PocketWizard Plus III for light painting


No comments:
Post a Comment